
CRAFT CATCH UP!
I don't know why I don't craft and blog, craft and blog. I do one or the other and forget the other part. It's not a good way to build followers. I thought I would catch you up with my crafting endeavors.
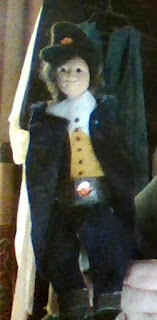
I started looking through my camera roll for my St, Patty's Day gnome, and realized how much I did not share. I have updated the Peanuts, Welcome Great Pumpkin display with pictures.
For Thanksgiving I did several items. From Craft Klatch on YouTube, I decided to make a centerpiece of pumpkins and a sign.
Craft Klatch with Mona is a great channel. Mona crafts different things, but a majority of things I have viewed have been made with resin. In fact, it is from her channel that I learned about resin and how to use it. This craft project is not resin, but it caught my eye.
Mona used styro pumpkins she got at a Dollar Store and painted and fixed them up in her usual flare! I used two deli fruit bowls that I had on hand. I painted them to look like pumpkins, added wire tendrils and sat them in real leaves and curled orange ribbon on a painted white tray. This way the flat, open bowls did not give the half pumpkin away. I did do Mona's "Happy Thanksgiving" sign as she did in her tutorial. The result:

I added paper leaves cut from my Silhouette Portrait. I made the signs from glued popsicle sticks. It was an amazing hit!
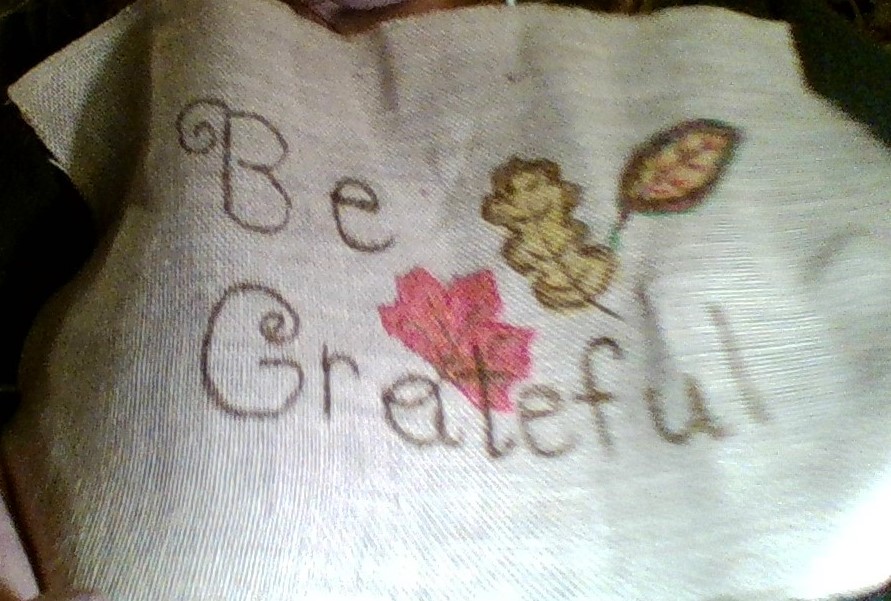
Mona also inspired me to design a pillow cover/sign on burlap that sends the message of Thanksgiving: "Be Grateful. I drew the letters by hand. Now, I'm thinking maybe I should crewel stitch them!

I recommend you visit Mona's channel. She is a wonderful, adventurous crafter and her tutorials are very detailed. She shares what she has learned and improves on her methods. She is a very warm person and I feel like I am right in her crafting corner with her. I love her motto "Life is too short not to shimmer so grab your glue and your glitter." If my floor isn't showing flecks and shines of glitter, I'm not crafting enough! Love that glitter! You can find #CraftKlatch on YouTube Craft Klatch
Every Thanksgiving, I see the figures of polyresin pilgrims and native Americans representing the first Thanksgiving. I have always wanted a set, but seems the budget gets short close to Thanksgiving and Christmas. Why is that? !!!
So last Thanksgiving, I decided to give it a try. I ordered a facial push mold and made the faces. Then, taking wire, I fashioned the body shapes of a man and woman pilgrim. I dressed them with scraps of material and felt, gluing them on the figures. I sew, but this seemed the most efficient way to fashion their clothes. For hair, I found a fluff of black felting. I played with giving him a beard. I used strawberry orange yarn for the lady's hair. I made the native American faces. I need to finish the bodies in the next eight months. Plenty of time, right??!!! lol Here are the pilgrims as I packed them away for next Thanksgiving.


I'm quite pleased with my first endeavor to make figures! I'm open to any suggestions as to form, process or ways to form the bodies.
For Thanksgiving, I also fashioned this turkey pin to wear. Rather crude, but he was loved by all.
I also wanted and had to have a straw turkey centerpiece as was so popular last year. So I took my raffi and tamale wraps and wire and made this little guy.
 I used polymer clay to make the head. My turkey's seem to have goofy faces!! I think, when he comes back out next season, I'll run some burgandy lines on those white feathers to pull it all together. I took a Christmas pick with glittered berries to make the clawed feet. What do you think? Let me know int he comments below + or -?
I received glass paints for review and decided to paint a Dollar Tree vase with fall leaves. Where did all this time come from??? I truly don't recall. lol Here is the fall leaf vase:
It took a few layers of paint to get the fallish colors.
WHICH BRINGS ME TO CHRISTMAS. Well, I am sure you know that the holiday season has so very much to do as it is without adding crafting, but somehow, I fit a bit of it in. I like to make gifts as well as decorations and some are both!

This is a paper wreathe made from a purchased design and cut out on my Silhouette Portrait.
I also made an advent wreath cutting pine sprigs from paper and taping them to a wire wreathe ring. I did not take pictures!! So when I pull it back out, I'll have to share that with you. The wreathe itself lies flat but it has burgandy ribbons attached to a small pole up the middle of the wreathe. The pole has a pinch clothespin at the top that holds the looped ribbons that drape from the wire wreathe. It is topped with a handmade gold glitter start.

I spent time redoing a small room tree. I love Shabby Chic and had little pink roses that I added to a simple little tree. I did the same with a tired wreathe I have had for several years. I added pink tiny roses to that as well and hung it in my room.

I don't know why I don't craft and blog, craft and blog. I do one or the other and forget the other part. It's not a good way to build followers. I thought I would catch you up with my crafting endeavors.
I started looking through my camera roll for my St, Patty's Day gnome, and realized how much I did not share. I have updated the Peanuts, Welcome Great Pumpkin display with pictures.
For Thanksgiving I did several items. From Craft Klatch on YouTube, I decided to make a centerpiece of pumpkins and a sign.
Craft Klatch with Mona is a great channel. Mona crafts different things, but a majority of things I have viewed have been made with resin. In fact, it is from her channel that I learned about resin and how to use it. This craft project is not resin, but it caught my eye.
Mona used styro pumpkins she got at a Dollar Store and painted and fixed them up in her usual flare! I used two deli fruit bowls that I had on hand. I painted them to look like pumpkins, added wire tendrils and sat them in real leaves and curled orange ribbon on a painted white tray. This way the flat, open bowls did not give the half pumpkin away. I did do Mona's "Happy Thanksgiving" sign as she did in her tutorial. The result:

Mona also inspired me to design a pillow cover/sign on burlap that sends the message of Thanksgiving: "Be Grateful. I drew the letters by hand. Now, I'm thinking maybe I should crewel stitch them!
I recommend you visit Mona's channel. She is a wonderful, adventurous crafter and her tutorials are very detailed. She shares what she has learned and improves on her methods. She is a very warm person and I feel like I am right in her crafting corner with her. I love her motto "Life is too short not to shimmer so grab your glue and your glitter." If my floor isn't showing flecks and shines of glitter, I'm not crafting enough! Love that glitter! You can find #CraftKlatch on YouTube Craft Klatch
Every Thanksgiving, I see the figures of polyresin pilgrims and native Americans representing the first Thanksgiving. I have always wanted a set, but seems the budget gets short close to Thanksgiving and Christmas. Why is that? !!!
So last Thanksgiving, I decided to give it a try. I ordered a facial push mold and made the faces. Then, taking wire, I fashioned the body shapes of a man and woman pilgrim. I dressed them with scraps of material and felt, gluing them on the figures. I sew, but this seemed the most efficient way to fashion their clothes. For hair, I found a fluff of black felting. I played with giving him a beard. I used strawberry orange yarn for the lady's hair. I made the native American faces. I need to finish the bodies in the next eight months. Plenty of time, right??!!! lol Here are the pilgrims as I packed them away for next Thanksgiving.


I'm quite pleased with my first endeavor to make figures! I'm open to any suggestions as to form, process or ways to form the bodies.
 |
| POLYMER TURKEY PIN |
I also wanted and had to have a straw turkey centerpiece as was so popular last year. So I took my raffi and tamale wraps and wire and made this little guy.

I received glass paints for review and decided to paint a Dollar Tree vase with fall leaves. Where did all this time come from??? I truly don't recall. lol Here is the fall leaf vase:

It took a few layers of paint to get the fallish colors.
WHICH BRINGS ME TO CHRISTMAS. Well, I am sure you know that the holiday season has so very much to do as it is without adding crafting, but somehow, I fit a bit of it in. I like to make gifts as well as decorations and some are both!

This is a paper wreathe made from a purchased design and cut out on my Silhouette Portrait.
I also made an advent wreath cutting pine sprigs from paper and taping them to a wire wreathe ring. I did not take pictures!! So when I pull it back out, I'll have to share that with you. The wreathe itself lies flat but it has burgandy ribbons attached to a small pole up the middle of the wreathe. The pole has a pinch clothespin at the top that holds the looped ribbons that drape from the wire wreathe. It is topped with a handmade gold glitter start.

I spent time redoing a small room tree. I love Shabby Chic and had little pink roses that I added to a simple little tree. I did the same with a tired wreathe I have had for several years. I added pink tiny roses to that as well and hung it in my room.
 |
| SHABBY CHIC ROOM TREE |
 |
| SHABBY CHIC CHRISTMAS WREATHE |

PILL CONTAINER ADVENT WREATH
The pill container advent wreath was a real challenge. I had kept the containers for years with this idea in my head. The trick I think is to make the pill containers NOT look like pill containers so that children don't get any confusion in the future. The above picture still isn't the finished product. I will do that soon as I heard there is a contest out there for pill container use. The idea is to fill the containers with candy, erasers, charms, little things that a child of eight years old would enjoy finding inside and playing with until Christmas. I will post an update with the details and finished product very soon.
The pill lids would also have a little charm, button or decoration glued to the inside. When it is opened, the pill lid is flipped over and replaced on the bottle showing a little tree decoration. Clever? what do you think? I also toyed with the thought of using a longer pill container as number one and inside of that, the Elf on the Shelf! as a way to introduce the little guy! However, doing that through off the balance of the tree and brought on a fail in my first attempt.
Here is the fail:
The key was to use containers of all the same size so that there is balance and symmetry. I knew that, I just got carried away with the idea. Does that ever happen to you?! |
| FAILED PILL CONTAINER TREE YOU SHOULD HAVE SEEN IT FROM THE SIDE! |
 |
| WOVEN NATIVITY WITH ADDED LED LIGHTS
My sister sent me this woven picture of the nativity that she found at Walmart. It is lovely in itself. I decided to add a set of led lights to punctuate the stars in the sky. I also added one tea light for the brightest star. It's hard to tell which one that is in this picture. I am looking for a frame so that I can hang this up next Christmas.
Okaaaaaaay I think I have brought my blogging up to date on crafts for the past holidays. I am currently working on Easter and will share those soon!
Thanks for visiting, reading and commenting.
~~Marie
|
You were busy! They all turned out great! Love them!
ReplyDelete